
[Fitbit] #3 Accelerometer Sensor, Fitbit SDK Guides
Fidbit SDK Guides
These resources will help you understand how to use each element of the Fitbit SDK.
Sensors Guides
Each Fitbit device includes a variety of hardware sensors that have been exposed through Sonsor APIs.
Accelerometer Sensor Guide
Accelerometers can be used to measure device acceleration, and determine orientation.
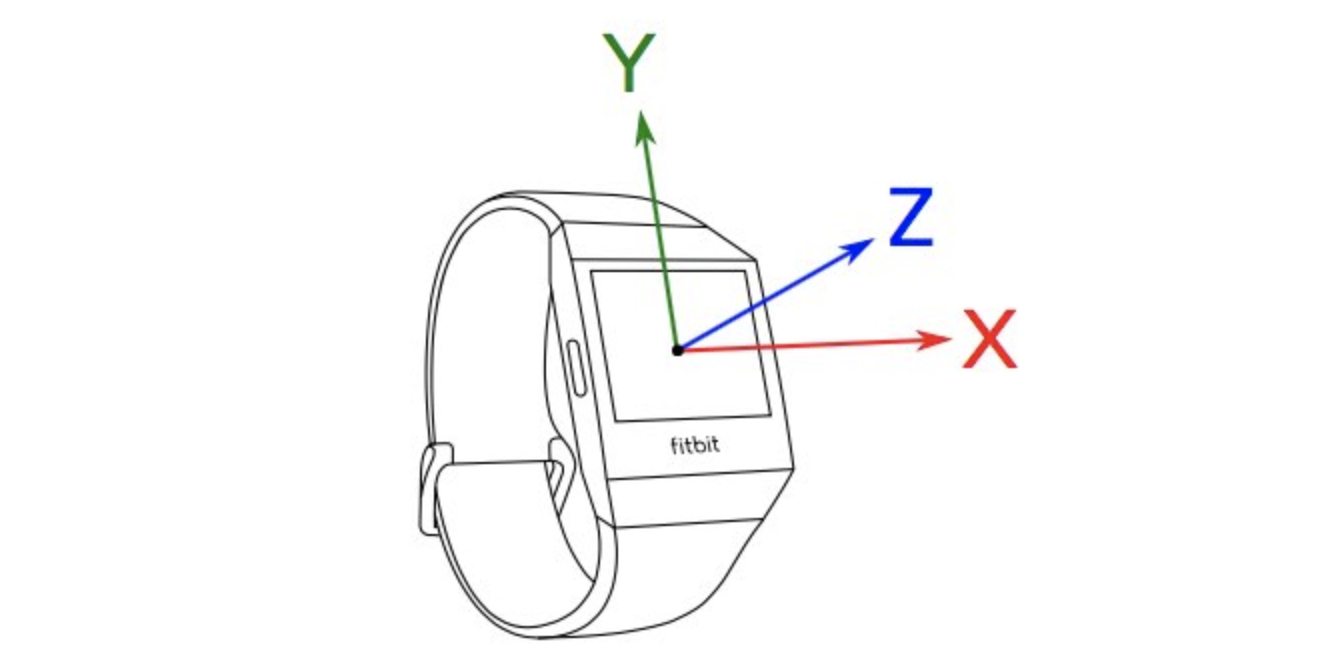
The sensor measures acceleration along 3 orthogonal axes: X, Y and Z.
A Brief Introduction to Axes
The X axis is parallel with the device’s screen, aligned with the top and bottom edges, in the left-right direction. The Y axis is parallel with the device’s screen, aligned with the left and right edges, in the top-bottom direction. The Z axis is perpendicular to the device’s screen, pointing up.
Acceleration includes the acceleration of gravity. So it the device is at rest, lying flat on a table, the acceleration along the Z axis should equal the acceleration of gravity (~9.8 m/s2), and the acceleration along the X and Y axes should be 0.
The accelerometer axes readings are provided as floating point values, in units of m/s2.
Peeking the Current Accelerometer Reading
If you need to check the latest reading from the accelerometer, you can access the properties directly from the accelerometer object using the onreading event.
By default, the accelerometer sample rate is 100Hz (100 times per second).
app
import { Accelerometer } from "accelerometer";

if (Accelerometer) {
  // sampling at 1Hz (once per second)
  const accel = new Accelerometer({ frequency: 1 });
  accel.addEventListener("reading", () => {
    console.log(
      `ts: ${accel.timestamp}, \
       x: ${accel.x}, \
       y: ${accel.y}, \
       z: ${accel.z}`
    );
  });
  accel.start();
}
Batched Reading
The Accelerometer API can also generate batches of data at a specified sample rate. This allows a developer to control the frequency that their application receives and processes sensor data.
The onreading event is emitted when a batch of readings is available, and the .readings property contains the sensor readings, with each data channel (x, y, z, and timestamp) as its own array.
By reducing the sample rate (frequency), or by increasing the batch size, developers will benefit from reduced CPU usage, and minimize their application’s impact on battery life.
In order to use batched readings, the batch property must be specified during the initailization of the sensor.
app
import { Accelerometer } from "accelerometer";

if (Accelerometer) {
  // 30 readings per second, 60 readings per batch
  // the callback will be called once every two seconds
  const accel = new Accelerometer({ frequency: 30, batch: 60 });
  accel.addEventListener("reading", () => {
    for (let index = 0; index < accel.readings.timestamp.length; index++) {
      console.log(
        `Accelerometer Reading: \
          timestamp=${accel.readings.timestamp[index]}, \
          [${accel.readings.x[index]}, \
          ${accel.readings.y[index]}, \
          ${accel.readings.z[index]}]`
      );
    }
  }
  accel.start();
}
Automatically Stopping and Starting
One of the best ways to conserve battery life is to stop the sensor when the display is off. You can use the Display API to respond changes in the screen’s power state.
app
import { Accelerometer } from "accelerometer";
import { display } from "display";

if (Accelerometer) {
  const accel = new Accelerometer({ frequency: 1 });
  accel.addEventListener("reading", () => {
    console.log(
      `ts: ${accel.timestamp}, \
       x: ${accel.x}, \
       y: ${accel.y}, \
       z: ${accel.z}`
    );
  });
  display.addEventListener("change", () => {
    // Automatically stop the sensor when the screen is off to conserve battery
    display.on ? accel.start() : accel.stop();
  });
  accel.start();
}
Accelerometer Best Practices
Here’s a simple list of best practices to follow when using the Accelerometer API:
- Always use the most optimal frequency for your specific needs.
- Don’t forget to call
accel.stop();when you’ve finished using it. - Check if the sensor exists before using it.
The Accelerometer in Action
If you’re interesting in using the Accelerometer API within your application, review the Accelerometer API reference documentation.

댓글남기기